Jennifer & John’s Morris Arboretum Wedding

Absolutely in love with the photos from Jennifer & John’s wedding that Ashley Bartoletti captured, and it was just the kick in the butt we needed to get back to blogging! Maybe it’s Pantone’s color of the year, but we’re totally in love with this lavendar/purple palette! Happy first day of July!

2014-07-01_01 2014-07-01_02 2014-07-01_03 2014-07-01_05 2014-07-01_005 2014-07-01_06 2014-07-01_006 2014-07-01_07.5 2014-07-01_007 2014-07-01_08.5 2014-07-01_08 2014-07-01_09.5 2014-07-01_009 2014-07-01_010 2014-07-01_11 2014-07-01_011 2014-07-01_012.5 2014-07-01_012 2014-07-01_021 2014-07-01_023 2014-07-01_041

Photography: Ashley Bartoletti Photography | Florals: Belovely | Venue: Morris Arboretum

Lamps.com DIY

2014-04-24_0015This spring, we were asked by Lamps.com to participate in their DIY lamp shade contest! They sent us a blank, white, drum lamp shade to turn into something wonderful. We took an organic, modern approach to the challenge trying out a new technique of sharpie + rubbing alcohol on fabric. After some trial and error we finally mastered it. Below is the full DIY steps we took to achieve this look on our lamp shade!

2014-04-24_0008What you need:

– q-tips
– cup or bowl
– fabric (we used muslin)
– rubbing alcohol
– sharpie (we used black but any color works)
– printed design (optional)

2014-04-24_00091. Pour rubbing alcohol into your cup or bowl, about an inch deep.
2. Place your fabric over the design you want, you should be able to make out at least some of the design through the fabric.

2014-04-24_00102014-04-24_00113. Trace your design onto the fabric with your sharpie, we found that tracing your design in sections helps the ink bleed better when it is fresh.
4. Soak the end of a q-tip in the rubbing alcohol, really soak it – it should be dripping.

2014-04-24_00125. Dab the end of the q-tip onto the fabric right NEXT to the sharpie marks – not directly on the line. The sharpie will bleed in the opposite direction you place the q-tip.
6. Continue dipping the q-tip into the rubbing alcohol after you touch it to the fabric. Work your way around the design.

2014-04-24_00137. Once you have finished this section, repeat steps 3-6 on the rest of your design until it is completely transferred onto the fabric.
8. Let the entire piece dry completely before using.

2014-04-24_0014We had a blast taking our completed lamp shade and styling it with our favorite things.  Laura Olivia Photography was kind enough to take photos of the finished product! It was hard deciding which one we liked best, so here are three different ways to style this organic/modern lampshade in your home!

2014-04-24_00162014-04-24_00172014-04-24_0018


How-to photos snapped by Belovely // Editorial shots by Laura Olivia Photography // Lamp shade provided by Lamps.com

‘Bee’ is for BOY!

Well we posted the news on Instagram and Facebook, but of course we need to share the news on our blog!

Baby L

Yup! I (Lauren) am pregnant again!  I couldn’t be more grateful all the support I’ve had over this past year after loosing Baby Cane last March and after a rough year we’re so happy that we’re back to starting our family again, and this time with a healthy baby boy!

Since wedding season takes off first thing in May and I’m due early August, I’m realizing that in order to properly prepare for baby, I needed to get on the horse and start this nursery design! Since my first trimester left me with many sleepless nights…like many of my brides, I kind of over did it on Pinterest. (hey, it’s something that captures my attention for hours and I don’t even have to leave the bed!) I’m now happy to say that I’ve narrowed things down and started gathering things on a registry.

Nursery Theme: My Little Adventurer.

nursery

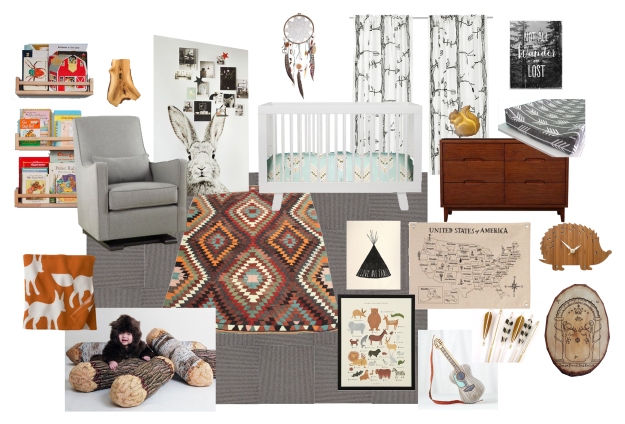
I know the woodland theme is super popular, but I wanted to stay a bit more textural and geographical than covering the room in animals. I want my little man to grow up curious about the world around him.

This post is a bit premature in that I literally JUST finished this design board and haven’t numbered things out to correctly post links to the items in a blog post. So, if there is any item in my design that you’d love to know where I found it, please just leave a comment and I’d be happy to oblige!

We have some construction work to finish up on the room  such as:
1. Expanding the closet since the closets in our 120+ year old home are only 12″ deep and roughly 3′ wide
2. Replacing a door to the balcony (yes our nursery opens up to a balcony and I can’t WAIT to put a rocking chair out there and enjoy baby time in the fresh air!)
3. Replace the room’s large picture window (this winter has made us well aware of the crazy drafts those old things get!)
4. Paint the ceiling & walls – you don’t see a paint chip in the design board cause I’m going white. Nothing shows texture and pops color better than a nice white backdrop.

Fingers crossed we can accomplish all that in the month of March so by April we can load in some artwork, rugs, window treatments and really get things going!

xo,
Lauren